ResoSwitch
![]()
ResoSwitch
ResoSwitch is a lightweight Windows tray application that lets you instantly switch between screen resolutions using a global keyboard shortcut or tray menu. It is ideal for anyone who frequently changes display settings, such as during remote meetings, presentations or content creation. With ResoSwitch, you can quickly toggle between resolutions without interrupting your workflow.
✨ Features
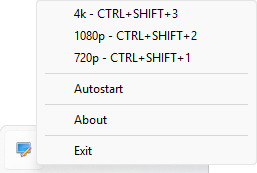
- ⚡ Instantly switch resolutions with a global hotkey or tray menu
- 🛠️ Fully customizable resolution presets and shortcuts via an INI file
- 🧵 Minimal resource usage
- 🪟 Native Windows support (no dependencies)
- 🖥️ Runs quietly in the system tray
- 🗂️ Auto-generates config file on first run
- 🔄 Autostart: Enable or disable app autostart directly from the tray menu (checkbox)
💡 Motivation
I often found myself needing to switch my screen resolution from 4k to 1080p during remote meetings. While 4k is perfect for my own work, it makes shared screens hard to read for others. Manually changing the resolution each time was tedious and disruptive. ResoSwitch was created to make this process instant and effortless, so I can quickly adapt my display for better readability and collaboration—without breaking my workflow.
🔧 Use Cases
- Quickly switch to a lower resolution for screen sharing, gaming, or recording, then revert to native
- Improve readability or accessibility by toggling larger resolutions
- Set up any number of custom resolutions and shortcuts for your workflow
📦 Installation
- Download the latest release from Releases
- Place
ResoSwitch.exeanywhere you like - Run the app (it will create
ResoSwitch.iniif not present) - Edit
ResoSwitch.inito add or change resolution presets and shortcuts - Use the tray icon or your shortcuts to switch resolutions instantly
⚙️ Configuration
- The app uses an INI file named after the executable (e.g.,
ResoSwitch.ini). - Each resolution is a section with
label,width,height, andshortcutattributes. - Autostart can be toggled from the tray menu. When enabled, the app will start automatically with Windows; when disabled, it will not.
- Example:
[4k]
label=4k
width=3840
height=2160
shortcut=CTRL+SHIFT+3

[1080p]
label=1080p
width=1920
height=1080
shortcut=CTRL+SHIFT+2
🛠 Tech Stack
- C++23
- Windows API (native Windows programming)
- CMake (build system)
- cl (Visual Studio C++ compiler)
- Windows Resource Scripts
- GitHub Actions (CI/CD)
🛠️ Building from Source
The source code is available on GitHub at https://github.com/dominikcebula/ResoSwitch.
To build the project, you need either Visual Studio 2022 (IDE) or Build Tools for Visual Studio 2022 (command-line tools).
You can download Visual Studio from Visual Studio Downloads.
If you prefer to use only the command-line tools, download the Build Tools for Visual Studio 2022 from the same page. Scroll to the “All Downloads” section, select “Tools for Visual Studio,” and choose the download option.
CMake is included with the Visual Studio installation.
To build the project from the command line, run:
cmake -B cmake-build -DCMAKE_CXX_COMPILER=cl -DCMAKE_C_COMPILER=cl -DCMAKE_BUILD_TYPE=Debug
cmake --build cmake-build --config Debug
This will create a cmake-build directory containing the build files and the executable.
The executable will be located at cmake-build\src\Debug\TrayApp.exe.
To build the project using the IDE, open the CMakeLists.txt file in Visual Studio, select the desired build
configuration (Debug or Release), then build and run the solution.
📝 License
MIT License. See LICENSE for details.
👨💻 Author
Dominik Cebula